Friday, August 30, 2013

Android Studio - Android's New Development Environment

Quoted from here.

"Android Studio is a new Android development environment based on IntelliJ IDEA. Similar to Eclipse with the ADT Plugin, Android Studio provides integrated Android developer tools for development and debugging. On top of the capabilities you expect from IntelliJ, Android Studio offers:
  • Gradle-based build support.
  • Android-specific refactoring and quick fixes.
  • Lint tools to catch performance, usability, version compatibility and other problems.
  • ProGuard and app-signing capabilities.
  • Template-based wizards to create common Android designs and components.
  • A rich layout editor that allows you to drag-and-drop UI components, preview layouts on multiple screen configurations, and much more."
At the time of typing this, Android Studio is still at a very early stage (0.2), but could still be used as an alternative to the original Android SDK that uses Eclipse for development.

Original Picture Link

Friday, June 14, 2013

Android Application Development - Version 1.1, Final Blog Post

It has come to the end of the semester, and I have just completed version 1.1 of QuickPanel.


v1.1 Changelog:
- Added "Silent Mode" checkbox feature to the volumes screen
- Static text is now black, dynamic text is now coloured blue
- Changed the layout of some of the textviews and changed their sizes
- Added a feature to show the amount of available RAM (includes a refresh button)
- Added a "Brightness Preview" screen, which includes a logo of the application and a test pattern; button to the preview screen is located directly under the brightness seekbar

I'm still not sure whether I will continue to work on this application, but if I do, I will make a new development blog dedicated more to the applications development news and such, and leave this blog for educational blog posts (for any good tutorials or books I find, or post good things for new developers to know, etc.).
Since this is a newer version, I'm re-uploading all the source code and stuff like I did last time, and I will also include a downloadable version of the application in .APK format, which can be installed using tools like Astro File Manager, ES File Manager, AirDroid, and other file managers.

QuickPanel 1.1 APK:
Mirror 1 - DropBox
Mirror 2 - Google Drive

Workspace Files (.zip):
Mirror 1 - DropBox
Mirror 2 - Google Drive

Saturday, June 8, 2013

Android Application Development - Source Code & Files

Since I consider the current progress of the application to be at the first version/"1.0", I thought I'd include all the applications source code and such, and since I might not have enough time to add any more to it (but if I do add more, I'll re-upload all the files and code for the application once the project is over).

I've gone through all the activity classes and commented all the Java code on what it does and such, but since a lot of it would just be constant repeating (like "....onCreate; //when the app starts..." which is in every activity class) I gradually repeated less and less things as I went through the classes, so the comments will make a lot more sense if they are read in this order:
-MainActivity
-VolActivitiy
-MenuActivity
-AboutActivity

The links below are just the four activities and their code and comments:
MainActivity
VolActivity
MenuActivity
AboutActivity

These links below are the entire project's workspace files, which includes everything (manifest, layouts, classes, images, etc.):
Mirror 1 - DropBox
Mirror 2 - Google Drive

Friday, May 31, 2013

Android Application Development - New Screenshots


- Added a menu when the app starts
- Added an information page which is opened when the user touches "About"
Volumes adjustment panel is fully working, thanks to ProgrammerGuru's sample.
Having a few difficulties with the toggles panel. If I can't get it to work then I'll just forget about adding it to the app (it's fairly simple to code and Android already has toggle buttons for things everywhere anyways).
Fixed problem with code not working in other activities, I was just loading the XML only, not the Java code as well, which is done by loading the activity's class through an Intent.

Saturday, May 25, 2013

Android Application Development - Progress Update

Changes so far:
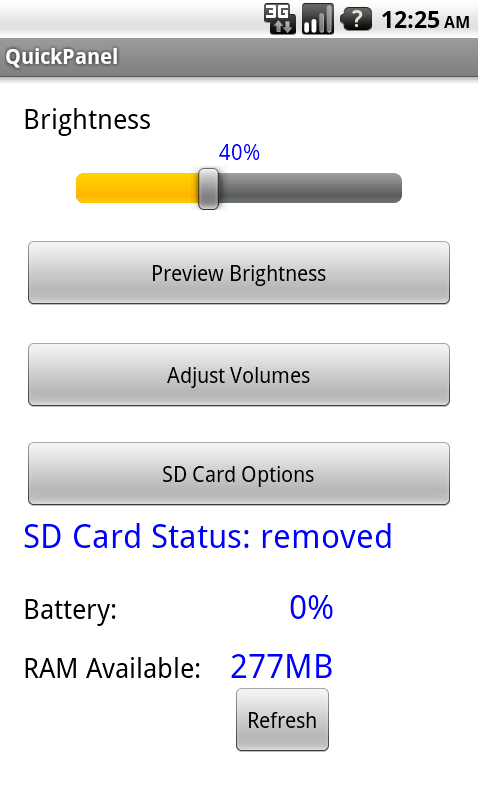
- Brightness adjuster now saves as soon as you stop sliding it
- Brightness adjuster % no longer ends with ".0" or something like ".999999998"
- Added a on/off button (still needs coding) and an options link button for Wifi, Bluetooth, Airplane Mode, and vibrate
- Reorganized XML layout code and Java code a little more (will post source code with comments once project is finished)
- Fixed problems with the layout in Landscape Mode (screen sideways)


I've been working on adding volume adjusters and toggle buttons for various services, but I find that is already being enough of a challenge and a learning experience already, so it is all I'm going to attempt to add for this stage. In the process of learning how to do volume adjusters, I've actually figured out a few more things to improve the brightness adjuster from the first stage, which improvements are always good. Since the original apps activity or "screen" is becoming quite full as it is, I've been trying to add the volume adjusters and toggles on 2 more separate activities, which I've discovered causes a problem with the functioning of the Java code (although I'm thinking it's a simple line of code that I'm missing or a small setting that isn't set just right). The code compiles and runs completely fine, and I'm able to switch between activities without any problems, but the code literally has absolutely no effect on the app at all even though I get the normal and proper errors for the code if something isn't right. The code works perfectly fine if I copy everything to the apps main activity, which makes me believe that it's a small thing such as a missing line or setting that I haven't figured out quite yet, but I imagine I'll get there.

Also, if you're a beginner and are having difficulty understanding a few things, here's a list of a few definitions that I had trouble with in the beginning of this project or when I've worked with other languages before:

onCreate - This basically means "when the app starts", this is where you put all the things you want to happen when the app starts, like getting certain values, or defining certain items.

; (semicolon) - This is what you put at the end of a line, not just every line, but only a line that's finished, so there are some times that, usually for organization purposes, you will have a line or two that don't end with a ';' because these group of lines are actually read as one line by the computer (in a certain way). I think of it like a period in a sentence, a sentence can be 3 lines on a page, but just because it reaches the end of the line on the page doesn't mean the sentence is finished, it's only finished when you see the period at the end.

= and == - Though these are both "equals" they actually mean two pretty different things. '=' is what you would use when you're setting or declaring something, and '==' is used when your searching to see if something is something specific (whatever you put after the '=='). So '=' is like saying "is" and '==' is almost like saying "if it is".

!== - means the same as '==' just the '!' makes it mean "if it isn't".

public, protected, private - This is a little harder to explain, try checking out this link.

void - goes after the modifiers in the definition above (i.e. public void). This means that the function doesn't return anything to the code that called it. It's like someone calling you saying "Dinner is ready" and you heard them, they know you heard them, but yet you don't reply, because no reply is needed.

float - a number that can only go from 0.00(...) to 1.0.

int or Integer - a number without a decimal on the end.

String - text, which can also include numbers, and therefore can sometimes be converted and used like an integer (you'll see an example of this in my source code once it's posted).

When it comes to small things like this that the books don't always talk about or fully define and you get stuck on something, you just have to remember that Google is your friend.

Monday, May 13, 2013

Android Application - Stage Two Plans

I'm still currently polishing up the first stage features, like looking for improvements I could do and adding comments, reorganizing the code, etcetera. While I'm doing this I'm also planning what I'm going to do with the app next, and so far my goals of what I want to add are:
- Volume Adjusters (seek bars)
- Wifi/GPS/Data/Bluetooth/Sync on/off toggle buttons
- A really quick splash screen to show this logo
But since those seem pretty simple, and the stages are supposed to be more challenging, I'm going to try and think of something else I can add in that would be a bigger challenge. The app currently is installed on my phone and starts and performs extremely fast and hasn't crashed or had any problems yet.

Also, if you're new to Java or Android development and you're having any problems, I've found that StackOverflow has been a great amount of help for anything having to do with Java or Android. The website is almost like a "Yahoo Answers" for programming since you can read old questions that have been asked and solved, or you can create a new question and get a bunch of helpful answers. What I like about their community is that they don't just fix the code for you, but they actually explain it and explain what was wrong with your code so you actually learn.

Saturday, May 11, 2013

Android Application Development - First Stage Complete!

The app in Android 4.2.2
The app on my phone (Android 2.2.2)


The first stage of the app is finished, with a fully working (and fixed) brightness adjuster, SD Card options link & SD Card status, and a battery status.
The two photos above aren't quite the current layout, but they're pretty close, the only difference is the test pattern image for the brightness at the bottom is now right below the brightness adjust seek bar, and the app is able to be scrolled down (had to do this so you could see everything when in  landscape mode).
I improved the brightness seek bar by fixing a problem where when the bar was dragged to 0% the screen would turn off (which is a problem that is pretty hard to get out of since the screen is completely off) by forcing the brightness value to go to 1% whenever it was brought down to 0% so it is impossible to cause the brightness to turn right off. I was luckily able to do this by a simple 2 lines of code, where many other people were trying to do this and this. I also had it display the percentage of the brightness instead of the decimal/float of it (50% would pop up as "0.5" on the screen) and the percentage doesn't show up until the bar is moved.
My plans for the SD card eject button had to be changed when I found out that Android doesn't allow apps to change and use SD card settings and actions (such as eject SD card) because it is a security risk to the user, so instead I just had the button bring the user into the storage settings menu where the "Eject SD Card" button can be found.
The battery level part was more difficult than I expected since it isn't as simple as "call BATTERY_LEVEL to get the battery's %" but it's actually more like a 'call to a call', like "call BATTERY_MANAGER to call BATTERY_LEVEL" which is a little more difficult to deal with.
I included the test pattern image so I could fill in some of that extra space, and it also helps the user adjust their brightness to something they're comfortable with.
After a few little tweaks and improvements to the current stage, I will start posting my second stage plans and layouts here, as well as a link to all the code I used and (hopefully) a video of the app.

Monday, May 6, 2013

Android Application Development - Brightness Bar Success & My Learning Approach

Without many problems, I've surprisingly already got a working brightness seek bar! I took a bit of a preview at some of the video tutorials and Android e-books and I noticed they all basically teach the exact same thing, like how to install the SDK and create your first project (which I was already much farther ahead of before I even started gathering learning resources). So since there is so little time for the culminating, and the books and video tutorials are extremely long, I thought I would try a different learning approach that has worked for me personally with many other things very well. I'm thinking I'm going to try a bit of a 'self teaching' approach, where I look at little examples of code here and there and see how others got other things to work and kind of teach myself the patterns of the code as much as I can (I find I retain this kind of information much better than if I read or hear it), and if I happen to get stuck at a certain point I can then refer to my books and videos.

 On to the brightness bar though - thanks to anindita9's brightness adjust sample, I was able to use some of the Java code on my brightness seek bar to test it out, and once I succeeded I started to 'pick apart' the Java sample line-by-line to observe how it works and functions (like what classes it uses, what methods are used, what libraries are imported, etc.). I'm starting to see how the coder set the specific seek bar to control the backlight of the screen (BackLightControl) and just used a button to update the system setting almost like a "save" button, instead of having the brightness update and save in real-time which would most likely be a bit harder to code and could even suck up more resources in the process by having the app constantly listening for changes to the setting. What surprised me with this sample is how simply coded the "update" button was, and how it basically just took the integer created from the seek bar and overwrote the brightness integer in the device's settings.

I still might make some modifications to it and see if maybe I can improve it to work even better for what I'm trying to do. I could even have like 'quick buttons' below the brightness adjuster that just quickly set it to a certain value (i.e. dark, normal, bright) or something similar to that.

Also, if you're new to OOP (Object-oriented Programming) the image below has some basic definitions that could help you understand what you're reading if you're looking up something online, reading an error, or reading a book on this kind of thing.


Monday, April 29, 2013

ADK: Android Development Kit - Who? Why? When? Where? How?

For developing my app, I will be using the development kit provided by Android. This kit contains two things:
-SDK Manager: Downloads API's, saves pages you will need from developer.android.com in .htm format (all the pages under "Training"), etc.
-Eclipse: The tool used for programming Android and Java apps and other things, very similar to Microsoft's Visual Studio which is used for .NET and C programming

This SDK is completely free, and is available at http://developer.android.com/sdk/index.html. Other software could  be used for the application development, but using this SDK would make it a lot easier since it is designed for development for Java and Android. You should have this SDK installed, set up, and ready by the time you start your reading/watching/learning so you can follow along with the tutorials. The SDK is also pretty mobile since it doesnt require any registry entries, and it comes in an archived folder, so wherever you bring that folder is where you are able to work on your app (so it's good to put on something like a cloud storage or a USB drive).

ADK - Android Development Kit
SDK - Software Development Kit
ADT - Android Development Tools
All three are basically the same thing.

Learning Resources That I Will Be Using

For the development of my application, I will be using a variety of different websites that give information and tutorials for Android development. Although the Android website has a collection of info and tutorials at http://developer.android.com/training/index.html, I'm still going to use a few other resources that hopefully teach me the things I need to know that the Android developer tutorials leave out.

Free Resources:
- http://developer.android.com/training/index.html
- Youtube Playlist: Android Bootcamp Series 2012 - http://www.youtube.com/playlist?list=PLE08A97D36D5A255F
- Youtube Playlist: Android Bootcamp Training - http://www.youtube.com/playlist?list=PLE953C0B85B50AB62
- iTunes U

Paid Resources:
- Various E-Books ("...For Dummies", Java books, Android Books)

Thursday, April 25, 2013

Android Application - First Stage Application Layout

App Layout in Android 4.2.2 - Jelly Bean

Making a Blogger Account for the Culminating Project

For part of the culminating you must create a blog where you will post your culminating projects' progress. For my blog, I just used Blogger since the email address I used for the course was a Gmail account, and you log into Blogger using a Google account. There are other blog sites out there, but in this post I'll show how to start using Blogger.

1. If you don't already have a Google account - make one.
(skip this step if you already have a Google account)

Go to www.google.ca and click "Sign In" (Top Right)
Click "Sign Up" (Top Right)
Fill out your information on the right side, "Mobile phone" is optional
Fill out the captcha code, and check "I agree.."
If you can't read your code, click the circle with the arrow to get a new one.

Once finished that part, it will ask if you want to add a photo or change your display name, this can all be changed later, just click "next step" then click "Get started" on the next page.

2. Setting up Blogger

After this you will be redirected to the Google home page, from here you can click "More" and click "Blogger", or just visit www.blogger.com and sign in with the Google account you just created (or that you already have).

It might bring you to a page saying "Confirm Your Profile", if so just click "Continue to Blogger".

If you are not already at www.blogger.com/home then go to there, and to start your blog click "New Blog" and choose a title and an address for it (below).
I'm going to use the "Simple" template for this example
Now that your blog is created, people can go to it by going to the address that you chose, for example this one is www.kylevanhorne17.blogspot.com.

3. Creating a post

Click the orange button to create a new blog post
After clicking this, you'll be taken to a page that looks a lot like Microsoft Word in some ways. Remember to give your posts a title, which you can do in the bar above the post's toolbar (thought I'd mention this since I completely didn't notice the "Post title" bar for my first post).

From here, you're good to go, it's pretty simple:
-"Publish" posts your post to your blog (your 'done' button)
-"Save" saves your post so you can continue it later (similar to "draft" with emails)
-"Preview" previews what your post will look like so far (obviously)
-Toolbar tools will show what they are when hovered over
-As you work on your post, Blogger automatically saves every once in a while, so saving isn't too critical.

Remember to email Mr. Perry the link to your blog as well (www.------.blogspot.com).

Android Application - Polished Logo

Square 500x500 Logo
 50x50 Button Icon
480x800 Phone Screen Logo

Wednesday, April 24, 2013

Android Application - Final Name, Rough Logo

 
For the name of my application, I've decided to use QuickPanel, and I've also designed a rough version of the logo above, which I will polish up as I get closer to finishing the app. The idea for the logo I had was to have a Q and a P (QP - QuickPanel) and have the line coming off the Q as the bottom of the P, which also forms a 'check' symbol (which is coloured green in the logo above). After designing the rough logo, I felt it was still a bit too empty, so I added a very light Android logo in the background. I chose the name QuickPanel because I found it was catchy, and it hasn't been taken for any other app in the Google Play Store.

Tuesday, April 23, 2013

Android Application - Current ideas and plans


Android Application - Current ideas and plans
 
 
Currently, I am still in the process of brainstorming and planning the total layout and features of the first stage (possibly the only stage depending on the amount of time available after completing) of the app. So far, my plan is to make an app that lets you access all those deep and hidden options and information (such as battery %, eject SD card, brightness, etc.) much quicker without the use of buggy and resource hogging widgets that crowd the desktop of your Android device.
Possible name ideas so far:
- [Smart or Quick] [Panel or Menu] i.e: SmartMenu
- SMART - Settings Menu Application [in] Real Time (if settings apply while they are changed, i.e: brightness changes as you are adjusting the brightness bar)
 
I will soon design a layout in Eclipse that will be a target layout or 'look' for the finished first stage, and when I do I will include it in the next blog post.
 
Current first stage goals:
-Brightness adjuster
-SD card eject button
-Volume adjuster(s)
-Battery %
-Compatibility for Android 2.2.2 and up